
Straw bale planting is an option for those with limited space, difficult ground or bad backs.
Straw is the dry plant material or stalk left in the field after a plant has matured, been harvested for seed, and is no longer alive. This is as opposed to hay bales, which are made from short species of livestock feed grass that is green when cut. A straw bale is traditionally a waste product which farmers do not till under the soil, but sell as animal bedding or landscape supply due to their durable nature.
Why would one want to grow a garden on a straw bale you ask? Well, straw bale planting does not require digging, so if you have a bad back and are unable to do the heavy work of traditional vegetable gardening this is a help. If you really have trouble bending, you can pile one bale on top of another, so you don’t have to bend at all. If you have a small patch of ground where the roots of trees have spread, preventing you from being able to cultivate or the ground might be rocky or badly compacted, the bales might be your solution. Because the bales provide a form of raised gardening, the plants might be in less danger from snails and bugs. If you place small mesh chicken wire under the bales, you will also not lose your plants to the dreaded moles. Or, maybe you just like the idea of trying out a fun new method of growing stuff.
Preparing your bales
It takes 10 days to prepare your bales for planting. The best straw bales for gardening are made from stalks of wheat, oats, rye or barley. Maize or mealie bales are too coarse. You might be dependent on what is available at your local co-op.
Use as many bales as you have space for. You may place them in a row or can get creative and lay them out in a pattern, making sure that you can easily move amongst them and that you can get the mower or brushcutter in between them if necessary. If you are considering planting vegetables such as beans, tomatoes or cucumbers, you might want to put them next to a wall providing they are still in full sun. It’s very difficult to move them later on so be sure you are happy with their placement from the beginning. Consider the sunlight requirements in general. If you do not have full sun, you might consider planting some herbs and lettuce.
Choose bales that are tied with synthetic string, as they won’t rot away with constant watering. The bales should be tightly bound. You can place the bales so that the strings are on or off the ground. However, if you lay your bales so that the stalks of the straw are horizontal, water is more likely to soak in, rather than flow straight through. If you have a holey old garden hose you can lay it across the tops of your bales as a permanent soaker hose ~ a form of drip irrigation ~ which makes your watering even more effective. Take note of where the water will drain away, so place the bales in such a way that you are not working on muddy ground.
You can plant seeds on the bales, but then you would probably need to spread some soil on the bales, which defeat the object. It is easier to transplant seedlings.
If your bales have been lying around on your plot exposed to the elements, you can begin your straw bale planting immediately. But if you are starting with new bales, it takes about ten days to prepare your bales for planting.
Days 1–3: Water the bales thoroughly and keep them wet.
Days 4–6: Sprinkle the bales with ½ cup of ammonium nitrate per bale per day, and water it well into the bales. If you would rather be more organic, you can spread a 3cm layer of fresh chicken manure or a thick layer of coffee grounds. A liquid fertiliser that is high in nitrogen (such as that made from comfrey, which has a good dose of potash as well) or manure or compost tea will work well.
Days 7–9: Cut back to ¼ cup of ammonium nitrate per bale per day and continue to water it in well.
Day 10: No more ammonium nitrate, but do add 1 cup of 10-10-10 fertiliser per bale and water it in well.
After 10 days, check the temperature of the bales. If they are too hot to touch, don’t plant anything yet ~ allow them to cool down to at least 35oC (just below human blood temperature).
Day 11: Transplant your plants on to the bales. It helps to use small sharp trowel or even a spatula to make a crack in the bale for each plant. Place the plant down to its first leaf and close the crack.
Some gardeners prefer to spread a layer of a 50-50 mix of topsoil and manure on the top of each into which they plant their seeds or seedlings. The soil is about 10cm thick on top of the bale. They maintain that it helps to hold the moisture in the bale better and adds nutrients to the bale during the season.
What to plant
Tomatoes, peppers, brinjals, squash, beans, Swiss chard and spinach, celery, peas, mangetout, cucumbers, chives, lettuce, butternut, parsley, basil and borage all work well.
For something different, try kale or globe artichokes ~ the moles should not be able to reach their roots ~ and experiment with different herbs.
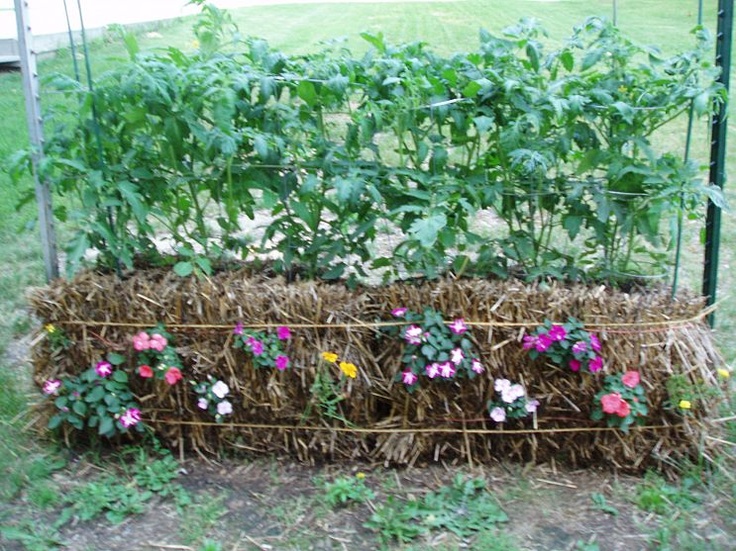
Plants that normally need staking will still require staking, so set up the poles or trellis once you have planted your seedlings. Root vegetables don’t do so well and mealies and sunflowers are too top heavy, but people even grow fruit such as watermelon and spanspek. Edible flowers such as nasturtiums and violets will make the bales pretty, marigolds perform their usual companion plant duties and you can plant flowers around the base, if you are worried about the aesthetics.
In terms of spacing, plant according to the spacing in square foot gardening. You can plant two tomato plants per bale, three pepper plants, three or four bean plants ~ follow your normal spacing.
Feed with liquid fertiliser (manure or compost tea for an organic option) every week or two. Once your harvest is complete, you can leave the bale for use again next spring, or if the bale has begun to decompose, cut the strings and spread the straw on your garden as mulch or add to your compost heap ~ a satisfactory conclusion to the straw bale planting process.
Im impressed and would try bale planting