
A chicken tractor is an effective way to move a small flock around your property, while still protecting the birds from predators, with the added benefit of bug control and instant fertilization wherever the tractor is situated. These tractors can be made to size, according to your flock size and requirements.
First, decide how large you want your tractor to be. This will be determined by how many chickens you have, and how or who will be moving the tractor around. A larger tractor, using heavier materials, will require the use of a ride-on mower, quad bike, tractor or bakkie to tow it from place to place. A smaller option can be wheeled by hand.
A very simple tractor can be made out of PVC pipe and chicken mesh. This will be lightweight, easy to roll around and not easily rusted or damaged by rain. Using this plan, however, you could also use aluminium tube or wood.
You will need PVC pipe, connectors, chicken mesh and shade cloth. See the design below for your top section and roof area with colour coded connectors explained in the text.
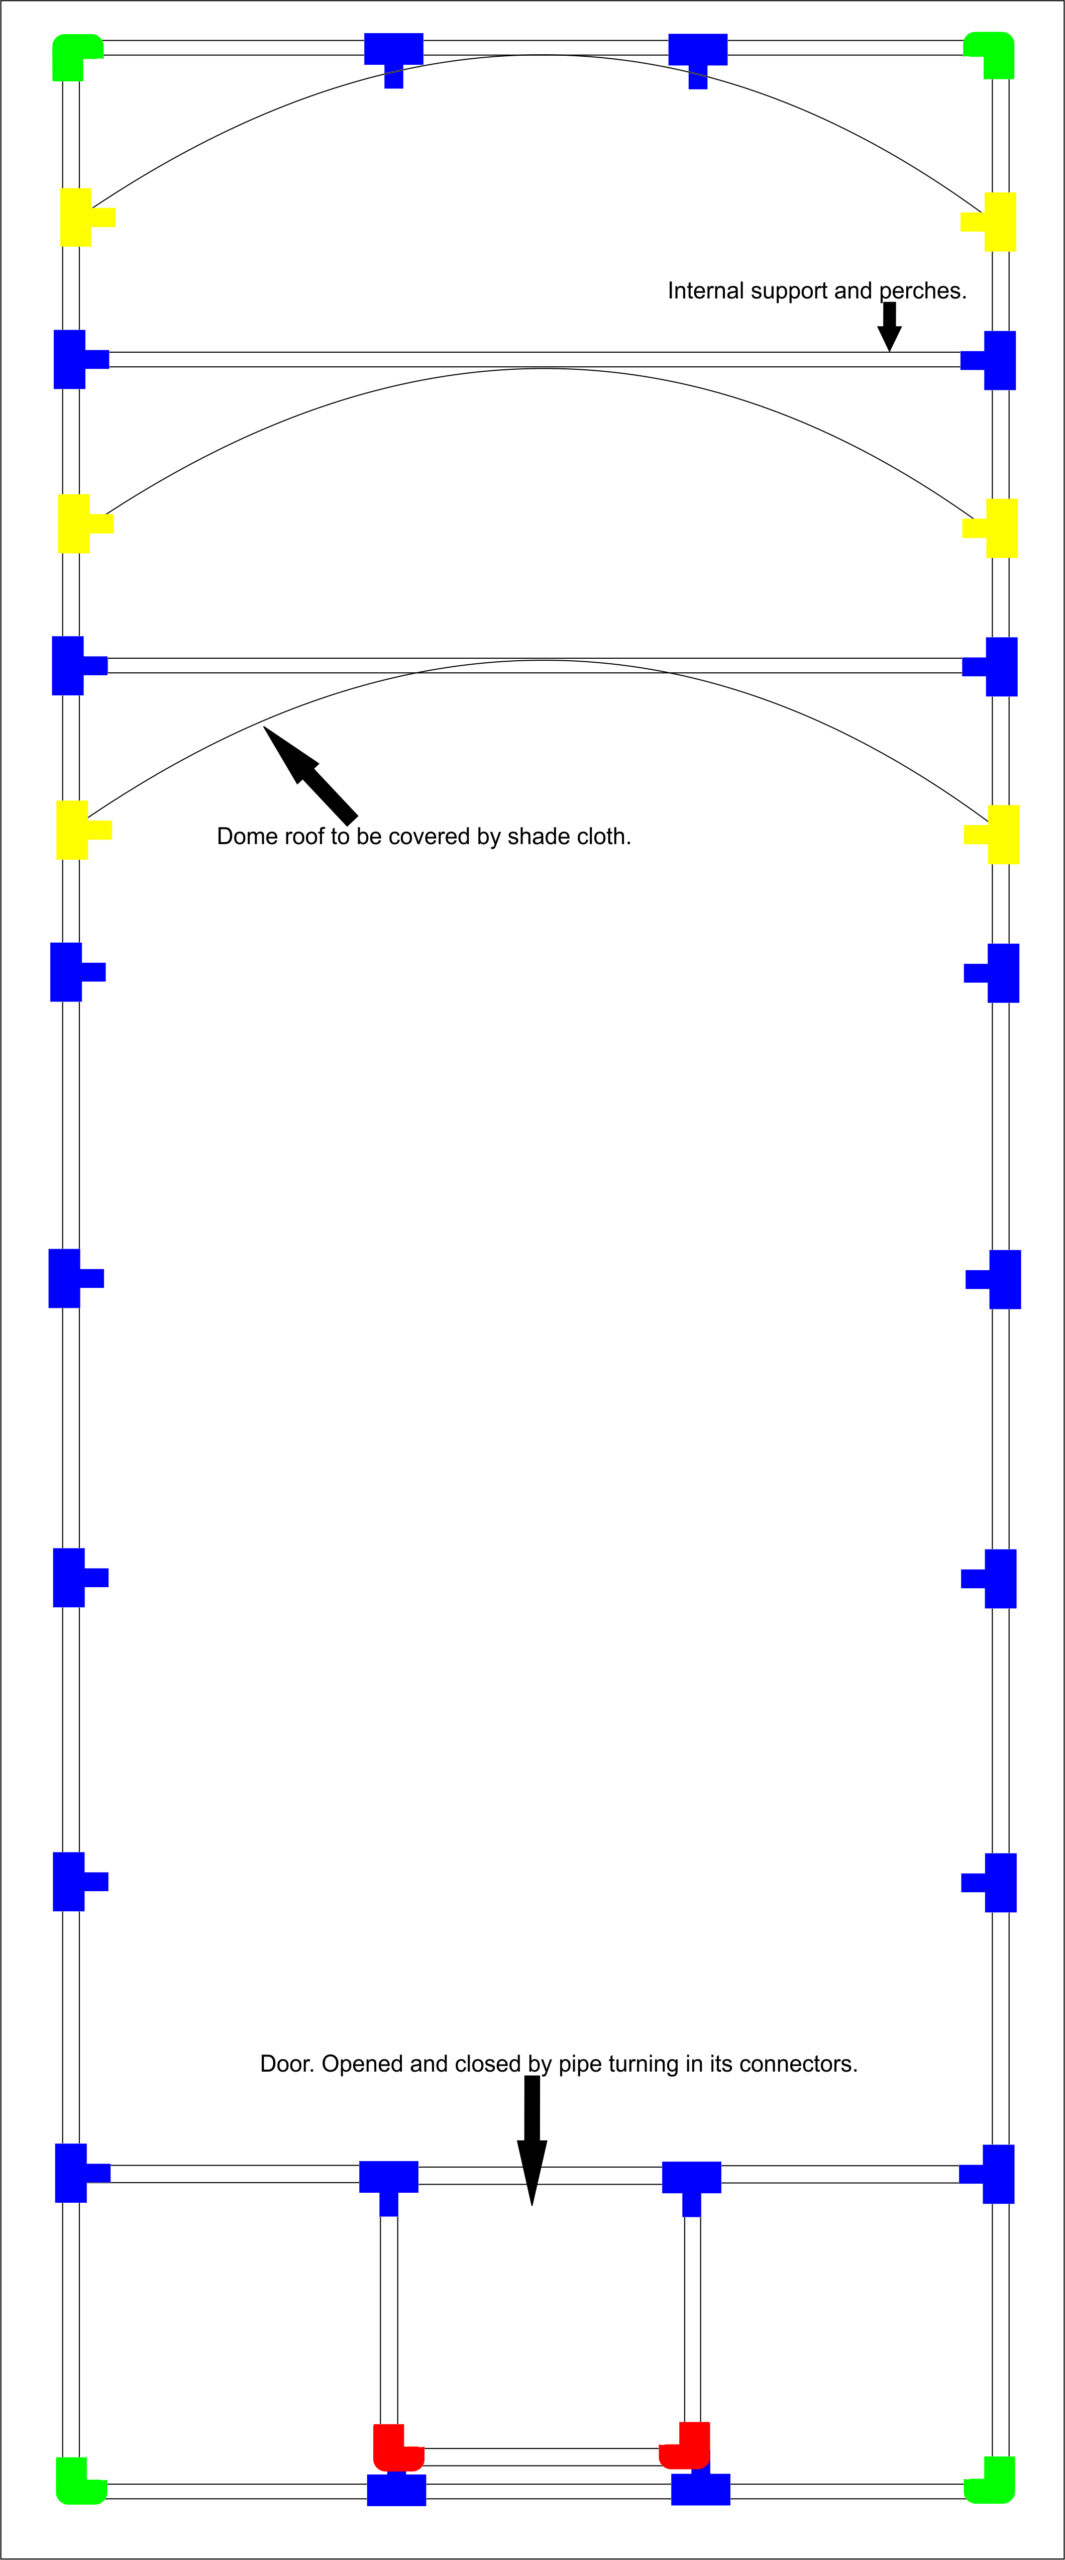
First, cut 34 pieces of PVC at 50cm length each. This will make up the base (22 pieces) and top and door (12 pieces). Lay out three pieces, connecting them with three-way T connectors (blue). Do the same for the back. Then, lay out eight pieces for the sides, connecting them with three-way connectors, and then join them to your assembled front and back. You should now have a rectangle of 400cm x 150cm. You can use PVC cement at the joins to strengthen it. Your corners will be three-way elbow joins (green).
Alongside your base, assemble the top. This will be made out of four 50cm pieces on each side, followed by eight 25cm pieces (joined at the yellow connectors). The reason for this difference is to later fit the connectors that will hold up your domed or pitched covered roof.
Next, cut 14 pieces of PVC for your vertical support. Here you will need to choose your own desired length according to how high you want your tractor. This will depend on what size chickens you have. A standard Potch koekoek, for example, will enjoy something between 55cm and 60cm high. Fit these vertically to your base at your T connectors. Then fit the top section to its corresponding vertical supports.
Next, cut three 50cm pieces of PVC for your support and door. Attach these to the joins second from the end of your roof. Do not cement these as they will need to move freely when you build your door. Attach the middle of this strip using more T connectors. At each of these, attach a 50cm piece of pipe. To the ends of those two pieces, using an elbow join, attach the top of the door (red).
Fit two 150cm pieces at the opposite end to your door. These act as both horizontal support as well as internal perches for your hens.
Finally, you will assemble the shaded section. Here you can use thinner PVC, stretched to curve into your base structure at the remaining joins. Or you can build a pitched roof, at a height of your choice, using V connectors. Once this is complete, attach your shade cloth using cable ties.
Then, using more cable ties, fit your chicken mesh to the walls and top of your tractor. Do not use any of the floor area as your chickens need uninterrupted access to the grass below them. Make sure there are no sharp edges or points sticking out that could hurt you or your chickens.
If you choose to replicate this design with aluminium square or round tube pieces you will need to weld the joins, or an even easier method will be to use a fitting such as the Connect-It joins designed for use on steel or aluminium. For a more natural look, you could use wooden thatching lathes wired together. This will require less cutting, and fewer joins. If you opt for wood or aluminum, you will need fewer vertical support structures as the base and top will be stronger than if you are using PVC pipe or conduit.
Your tractor will be lightweight enough o pick up and move by hand with two or three people. However, this will require some coordination to ensure you don’t lift it too high, allowing your chickens to escape. Better still, fit wheels to it and this will be ideal if you plan on moving your tractor long distances around your plot. Fit two wheels at the back and a handle on the opposite end to help with pulling or towing. The smaller the wheel, the more likely your tractor could get bogged down if your ground is damp or you are rolling through loose sand. Recycled bicycle wheels work well.
Another option for mobility is to add skids, instead of wheels. These can be made out of flat bar steel, curved upwards at the end to prevent it from digging into the ground.
A more substantial tractor can be made along a similar vein using steel and thicker wire mesh. However, this will almost definitely require the use of something mechanical to move it ~ be it a quad bike, tractor or bakkie.
Of course, as with anything on a smallholding, there exist more elaborate versions. You could choose to make a more permanent structure out of wood, set on wheels that acts as both a tractor and permanent coop for your flock.
To read more on poultry click here.
To subscribe to SA Smallholder click here.